
This article guides you through getting started with Realix ERC, focusing on setting up your first project in the Designer.
After installing the Realix ERC system (see the Installation and Setup Guide), you’re ready to start designing your first escape room using the Realix Designer. Whether or not you already have hardware available, you can begin right away.
This guide introduces the two main layers of the ERC system: the logical layer and the physical layer. It then walks you through two different starting approaches depending on whether you’re focused more on physical devices or puzzle flow.
Understand the Two Layers
Logical Layer: What the game does
In the logical layer, you define the structure and behavior of the game independently of the physical hardware. This includes:
- Defining Objects – These are the interactive elements your players will encounter, such as buttons, sensors, RFID readers, locks, multimedia devices, and more.
- Creating Tasks – These represent puzzles, actions, and experiences that make up the game flow. You organize these tasks in a visual diagram to define how the game progresses. During gameplay, the flow is dynamically driven by the state of the defined objects.
- Setting Up Events and Effects – Events trigger effects, which in turn change the state of an object or instruct it to perform a specific action.
A key advantage of this layer is that objects remain independent from real hardware until you explicitly connect them. This abstraction allows you to design and test the game logic freely, and later decide how to physically connect components—such as assigning specific I/O pins or connectors—without needing to change the logical setup.
Physical Layer: What hardware you use
In the physical layer, you define the devices used in your setup. Supported devices include Realix Boxes and Pods, as well as Philips Hue. All devices expose channels, which can be identified either by numeric address or name. Simple input/output channels and DMX lighting use numeric addresses. Devices like the Media Box, which provide high-level controls such as audio/video players or viewers, use named channels.
The logical layer connects to the physical layer by assigning objects to channels.
You can begin designing from either layer and link them together at any time.
Approach 1: Start with Physical Devices
If you already have hardware connected, this approach helps you build from the real-world setup.
Open the Designer and Create a New Project
Give it a name and connect it to your ERC Server. Without the server installed and connected, you can still setup your devices, but not auto-discover them. In that case you assign the physical box or pod later to the device.
Start adding devices
Go to the Room Setup page. You can access the Room Setup page from the top menu bar. In the Room Setup page, select Devices.
Click New to add a new device. In the New Device dialog:
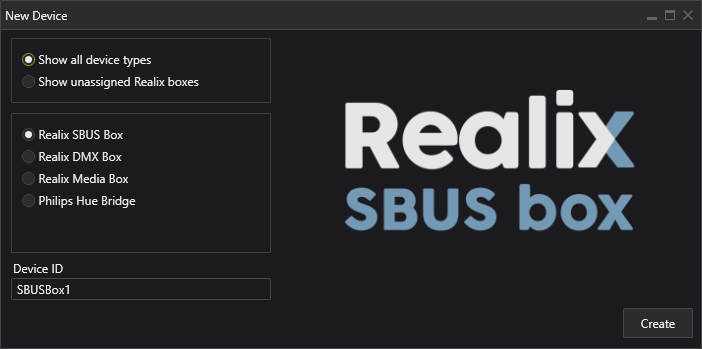
If you have a physical device connected and are connected to the server, select “Show unassigned Realix boxes”. This will display any automatically discovered boxes. If no physical device is available yet, you can create the device manually, by choosing from the list.
Note: Although the SBUS and DMX box use the same physical hardware (SBUS/DMX box), you must add them as separate boxes in the system, depending on the setting of the selector on the box
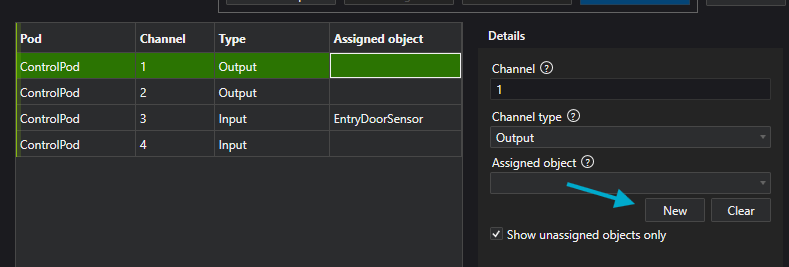
Add Pods to the SBUS-Box
In the detail panel of the SBUS Box, you’ll find a list of SBUS Pods.
To add a new Pod, click New below the list. This process is similar to adding a device: you can either select from a list of automatically discovered Pods or create one manually. If you create a Pod manually, the physical hardware can be assigned later.
In the image below, the two blue arrows indicate the new buttons for adding a box and a pod. If you manually select a box or pod, a red warning will appear indicating that no real hardware has been assigned yet. You can use the Assign buttons to select the appropriate hardware from a list of discovered devices.

Explore Device Channels
Each device exposes one or more channels:
| Channel Type | Example Use |
|---|---|
| Input | Buttons, (magnetic) switches, position sensor |
| Output | Locks, solenoids, servo position |
| Sensor | Analog sensors, potentiometer, temperature sensor |
| RFID | Reading tags/cards |
| Smart Controller | Play multimedia, show text and control custom viewers or controls |
| Light Control | Hue/DMX light control |
Note that the SBUS Box itself does not expose any channels, only the Pods do.
Create Logical Objects from Channels
For each channel, you can create an Object in the Designer in the Device View directly. Examples:
EntryDoorSensorfrom a input channelMainRoomLightfrom a light channelPictureReader1from an RFID channel
These objects now appear under their respective tabs in the Room Setup page and are ready to be used in puzzles, actions, or effects within the Game Flow page.
Approach 2: Start with Logical Design
If you’re still in the planning phase or don’t have hardware yet, begin with the logic:
Open the Designer and Create a New Project
Same first step as the other approach.
Define Logical Objects
Create objects representing game components like:
VaultLockas OutputHiddenRoomLightas LightElevatorDoorButton as InputAudioPlayer1as SmartObject / AudioPlayer
You don’t need to assign these to device channels yet. These can be connected to devices and hardware later.
Build Your Game Flow (Puzzle Schema)
Once your objects are ready, go to the Game Flow Page to model how your escape room progresses using the Logic Diagram.
Starting the diagram
In the diagram you will find 3 states drawn as a circle. You can move them but not delete them.
| State | Description |
|---|---|
| Room Start | The room is prepared and ready for the players |
| Game Start | The actual game is started, time starts to run |
| Game Finish | The game is successfully finished |
Then on the left side of the diagram you see three types of tasks. You can drag them into the diagram and start to build your room flow.
| Type | Description |
|---|---|
| Puzzle | A player challenge that becomes “solved” based on a condition |
| Action | A simple action to be executed by the players, like opening a door |
| Experience | A timed effect or narrative moment using lights, sound, or media |
Connect tasks
- Use arrows to connect puzzles, actions, and experiences.
- When a Puzzle is solved, it activates the next step.
- Actions and Experiences trigger instantly or after a set duration.
Build the Puzzle Logic
Define for each puzzle and action:
- A Solved Condition (e.g. certain objects are in the right state)
- Create an Effect Sequences for
OnActivate,OnReset,OnCompletedevents. - Add information that will be shown to the Game Host during the game
Effect sequences are a series of effects arranged on a timeline. Effects can include actions such as starting audio playback, changing the color or brightness of a light, or unlocking a lock. You can start creating effect sequences by selecting a trigger event, such as OnActivate or OnCompleted.
Puzzles and Actions are very similar, although you can’t create scripts for actions, as they are meant for simple, detectable events. By distinguishing actions from puzzles, your diagrams become more meaningful and easier to read.
Create an Experience
An Experience is a task like a Puzzle but it does not have a solved condition. They are used for situations where you need the attention from the players for a while to show:
- Showing video or sound
- Lighting scenes
- Audio/visual transitions
Create an Experience by building an effect sequence for the OnActivate event and assigning it a duration. The duration is important, no other tasks will be triggered until this time has fully elapsed. This ensures that players go through the experience as intended; they won’t be able to start other puzzles yet.
Linking Both Worlds
You can link physical and logical layers at any time:
- Assign a device channel to an existing object
- Or update an object’s channel if the physical setup changes
This means you can prototype your game fully in logic—even before hardware is installed—and connect it later.
What Next?
Once your logic and objects are set:
- You can Load the Room Setup and test Objects attached to hardware channels.
- You can Load the Game Logics and test your tasks.
- Use the Game Host application to run the game
- Use Prepper (browser-based) to prepare/reset rooms
For deeper understanding, check: