
The Game Host application offers a detailed overview of player progress. Since the server centrally manages the state of all objects, the game host has access to all the necessary data to monitor interactions and track the status of the active puzzle. The following image provides a preview of the Game Host application.
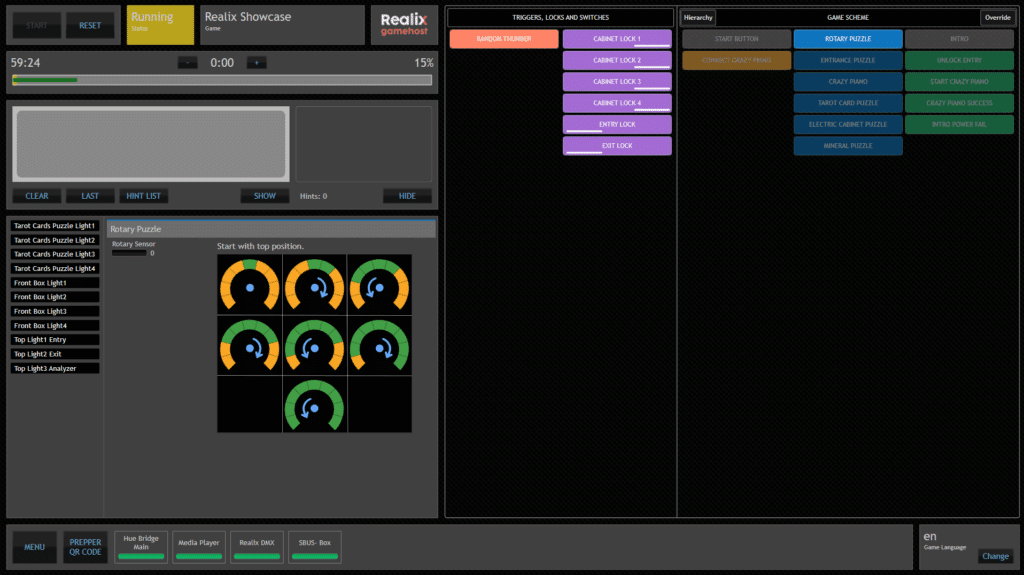
On the right side, there is an overview of actions, puzzles, and experiences. The grey blocks represent completed tasks, while the highlighted block indicates the active task. On the left side, feedback about the state and solution of the puzzle is provided. Progress is displayed in a bar, with the yellow segment indicating time passed and the green segment showing the players’ progress. Additionally, there is a field for displaying text hints, and other types of hints, such as audio, are also possible. The state of locks and some special effects that might be used during gameplay are shown in the center.
The Game Host application is designed to provide an intuitive user experience. The host is guided by clear progress indicators and the timely presentation of relevant information as needed. Below is a brief overview of each section.
Game control
The game controls are located on the left side and include the following elements:
- Start/Reset buttons to start and reset the the game.
- State indicator.
- Name of the room
This control is mostly self-explanatory, but it’s important to note the following: when the game is reset, it enters the Stopped state, and when prepared, it enters the Ready state. The game can be started from either state, but if Start is pressed while in the Stopped state, a confirmation box will warn that the game may not be fully prepared—such as puzzles not being set up properly or doors remaining unlocked. For more detailed information, refer to the Game States article.
Progress bar
The progress bar shows the overall time (yellow bar) and the players’ progress (green bar). Ideally, both bars should align. If not, this allows you to decide whether to help players speed up or let them struggle a bit if they’re ahead of schedule. If necessary, you can adjust the maximum game time using the plus and minus buttons.
Hint panel
The hint panel allows you to send hint messages, which can include text, video, audio, images, or a combination of these formats. Text hints can be typed and sent instantly, while video, audio, and images need to be prepared in advance using the Designer. Hints can either be global or assigned to a specific puzzle. Global hints can be accessed via the Hint List button, while puzzle-specific hints are displayed in the puzzle information view when the corresponding puzzle becomes active.
Game scheme
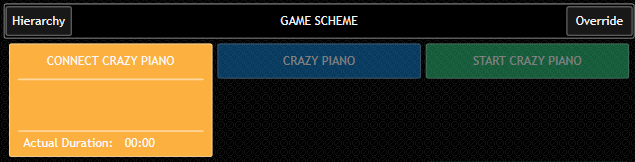
On the right side, the game scheme is displayed, with the option to view it in either a flat or hierarchical layout. Each task—whether it’s a puzzle, action, or experience—is represented by a card. Action cards are yellow, puzzle cards are blue, and experience cards are green. Inactive tasks appear dim, while active tasks are highlighted. Completed puzzles are greyed out, making it easy to track progress. Action and puzzle cards turn black when the game is in a stopped state and they are not yet reset for the next players, meaning the solved condition is still active. For more details about the schema and task behavior and preparation, refer to the article Puzzle Schema.
The cards expand when clicked, revealing more details. You can track the actual duration of each task, as shown in the image below, indicating how long it has been active and unsolved.
If a task is completed electronically, there is nothing to control within the task. However, when Override is selected at the top right, buttons appear to allow manual override of the task. This is useful if players are stuck for too long, or if a puzzle component isn’t functioning as expected or is defective. You can see these buttons in the image below.
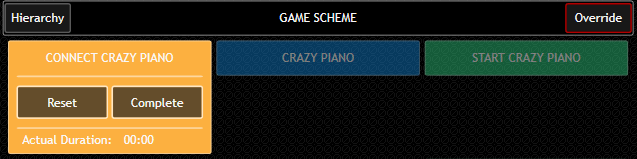
In this case, the buttons only appear when Override is selected. However, for puzzles that are not electronically detected—meaning no “solved” condition has been set in the Designer—a Complete button will always be visible, regardless of whether the Override button is selected.
Light and task panel
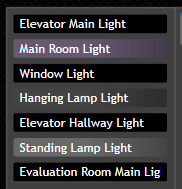
On the left side, you’ll find the light and task panel. The selected lights are displayed in the left column, with the selection already made in the Designer’s lights view. These lights typically refer to environmental lighting, rather than puzzle-specific lights, and are used to illuminate the room. Displaying the lights here gives the game host a clear impression of which rooms are dark or lit, which may not always be immediately visible through an infrared camera. See an example below.
The right column displays specific information about actions and puzzles. When an action or puzzle becomes active, a task panel appears here. The content of this panel is defined in the Designer and can include selected lights and inputs, text or images with information about the solution, and predefined hints assigned to the task. In the title bar, if explicit completion by the game host is required, a Complete button will be shown. This button is also displayed when Override is selected in the Game Schema panel.
Triggers, locks and switches
This panel displays controls that are available both before and during the game, but are not part of the game schema. The triggers (colored orange) allow you to launch test effects before the game starts or inject effects during gameplay. The appearance of these triggers is defined in the Designer. The locks (colored purple) and switches (colored teal) feature two buttons to lock/unlock or switch on/off.
Locks and switches will turn black when the game is in a Stopped state, indicating they are not yet properly prepared. For example, if a lock is supposed to be locked at the start of the game and it is not yet, it will remain black until it is locked.
For more information about these controls, refer to the Concept article Logic Controls – Lock, Switch and Trigger.
Health panel
The panel at the bottom, next to the Menu button, displays the health status of all devices. Each device should show green, indicating that all parts of the system are running smoothly without any issues.
Installation
For installation details, see the Installation and Setup Guide.