
The Realix Designer allows you to define room objects, game flow, effect sequences, and devices. This article provides an overview of the available editors, but it’s recommended to start with the Concept articles, as a solid understanding of core concepts will make the editors almost self-explanatory. In the following sections, you’ll find an overview of the application’s pages and panels. Detailed help on specific topics is also available directly within the Designer, where you’ll find a question mark icon ( 
Project overview
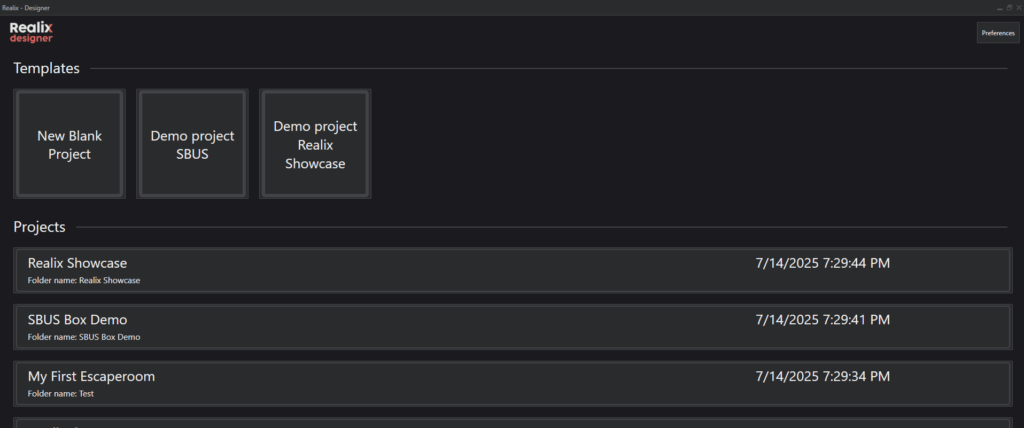
The project overview shows project templates. You can start a blank project or use one of the demos as starting point.
The top bar

An open project displays a bar at the top. This bar is divided into two sections: on the left, a selector lets you navigate between the available pages, while on the right, you’ll find information and controls for testing objects and evaluating the game flow. For more details about these controls, please refer to the article Design, Test, and Release.
Main page
On the main page, you’ll find settings and resources for your project. Projects are stored relative to the main folder specified in Preferences. The History feature helps you revert to a previous version, while Auto-Save automatically creates timestamped Auto-Save Files during editing. Learn more about this subject in the Project Management article.
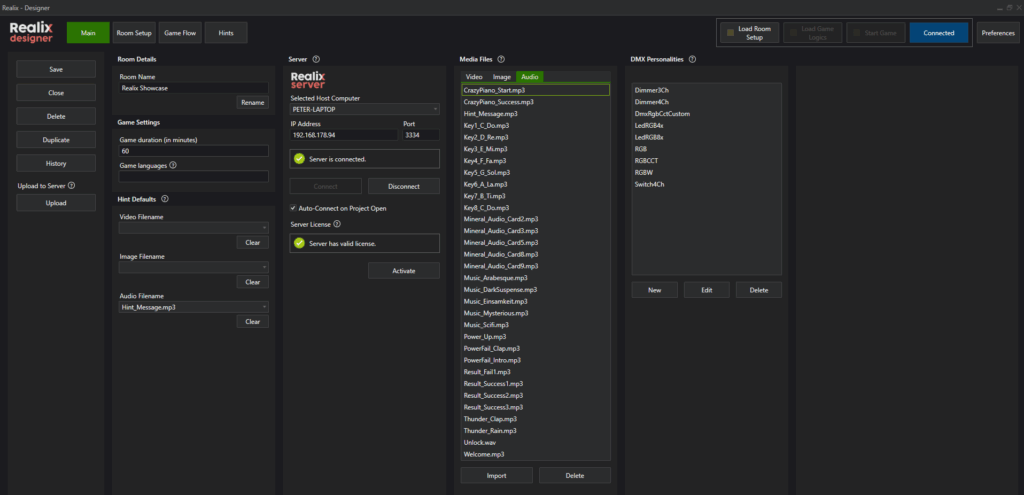
General information is entered under Room Details. In Game Settings, you can specify the game duration and select the available languages you want to offer to players. For in-game multi language support refer to Multilanguage Game Support. Under Hint Defaults, you can set a default video, image background, or audio fragment to accompany each hint provided to players.
In the Server panel, specify the IP Address and Port to connect to the Realix Server. The Designer can be used independently, but the Realix Server is required for testing and evaluation. When ready, enter the connection details and select Connect. You can connect manually or enable Auto Connect on opening room to have the Designer automatically connect to the server each time the project is loaded.
You can manage essential resources like Media Files and DMX Personalities at the Main page. Media files are defined here in a media library, allowing you to use them in effect sequences or scripts while ensuring they stay organized with the project. DMX Personalities define lighting functions for connected fixtures, with standard options provided in the Designer. These standard personalities are typically sufficient for most setups, making it rarely necessary to create custom ones. Read more about media files in Media File Management and DMX personalities in DMX Personality Library.
Room Setup page
In the Room Setup section, you specify the devices, define the objects to be used, and also connects objects to the appropriate device channels. The tab at the top, Devices, is the place where you define the devices with their channels. The other tabs are used to define the objects that you will use in your game logics.
Device Setup
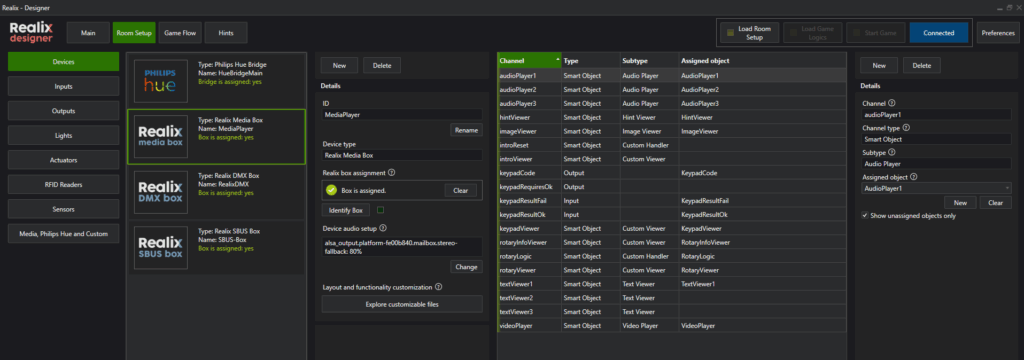
In the screenshot below, the Devices tab is shown. Devices are listed on the left, while their channels and assigned objects appear on the right. Realix devices can be quickly added or assigned using auto-discovery. The table on the right displays the available channels for each device. From here, you can assign existing objects to channels or create new objects directly.
If you already know which objects—such as specific locks or sensors—will connect to which device, you can create and assign them immediately. Alternatively, if you’ve already defined the objects, simply choose the appropriate channel on the device and assign the object from the list. This decoupling of objects and channels gives you great flexibility to move objects between devices or to different connection points on the same device—making future adjustments easy and efficient.
For more detailed guidance and a deeper understanding of how channels work, refer to the Devices and Channels article.
Objects Setup
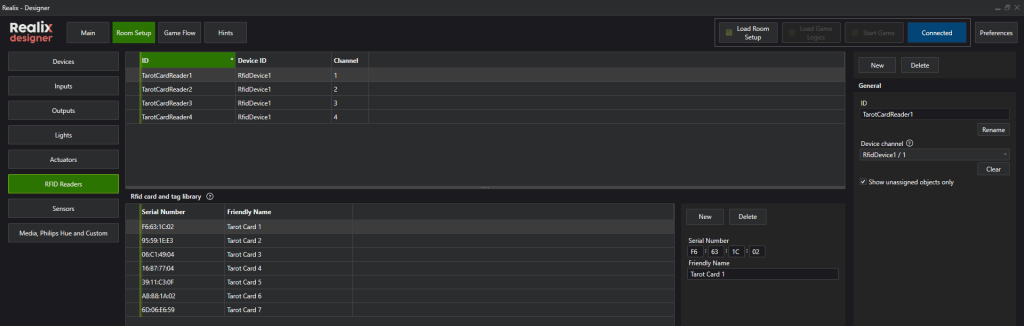
Objects are organized by category. For example, the Inputs tab below displays all digital input objects and the channels to which they are mapped.

The RFID Readers tab has an extra grid where you can give meaningful names to any tags you use. This way you can test in your software to a name instead of the serial number. This is a big advantage in Solved Conditions and in scripts.
Testing your objects is simple. When you select “Load Room Setup,” all devices are started, allowing you to adjust values for output objects (such as Outputs, Lights, Actuators, and Media) and input objects (like Inputs, Sensors, and RFID). Below, you can see the Lights tab in test mode, where you can set a color and observe how it appears on the actual light in real time.
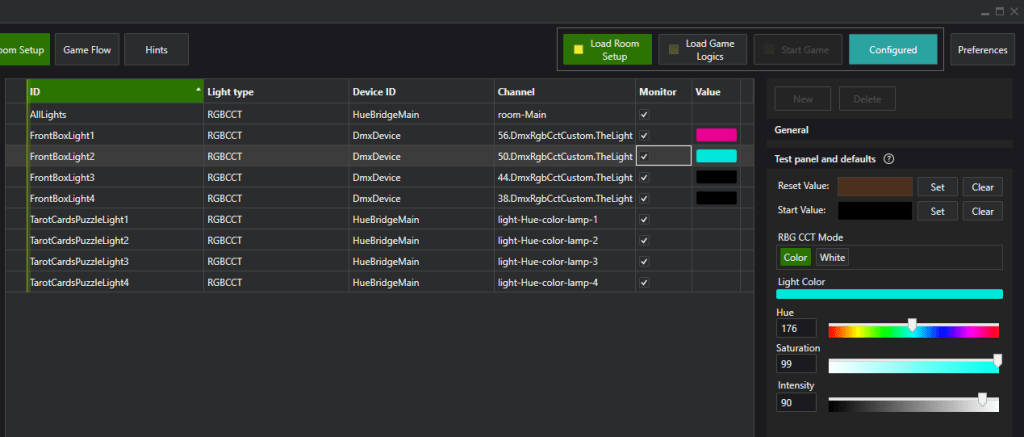
For light objects, you can define both Start and Reset values. When the game is started—which refers to the moment the room is prepared and ready, not necessarily when the players begin—the Start values for the lights are applied. When the game is stopped—which means the game host actively ends the session, not just when the gameplay concludes—the Reset values are applied.
For more information on objects, refer to the Objects article, which discusses all object types in detail.
Game Flow page – The Logic Diagram
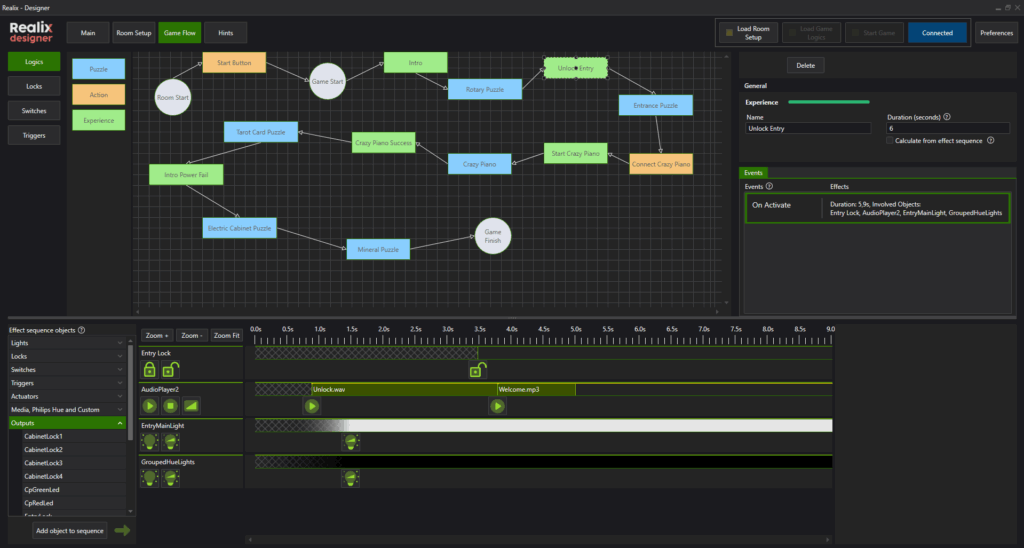
In the image below, you can see the two most important editors on the Game Flow page.
The upper half of the screen displays the game logic diagram, while the lower half features the effect sequence designer, a tool for arranging a series of effects along a timeline, to be triggered by specific events. In this section the logic diagram is dicussed
In a newly created logic diagram, three main states are provided as anchor points for the game. These states are fixed and cannot be removed.
- Room Start: This state is activated when the game host starts the game. At this point, no time is running yet, but the system is ready to receive visitors.
- Game Start: This marks the moment when visitors actually begin their game, and the timer starts running.
- Game Finish: This state is reached when the game is successfully completed. Time stops.
When designing the game, you will work with three types of tasks:
- Puzzles (blue): These are your main components and can have either simple or complex logic.
- Simple puzzles wait for completion and may include intermediate effects.
- Complex puzzles involve custom scripts for more advanced behaviors.
- Actions (yellow): Similar to puzzles but limited to simple logic. Actions are designed for events like detecting when a door is opened.
- Experiences (green): Used to play effects over a set duration, requiring the players’ full attention. Players cannot proceed until the experience finishes. Examples include showing a video or moving an object by powered mechanisms.
The states and tasks can be configured in the side panel on the right. The following sections provide an overview of these settings.
Logic settings – Main
In the Main settings, you can define the name and duration of a task. For puzzles and actions, you can enable the setting “Game Host must manually complete” to control how the component is marked as finished. For puzzles, you can also choose to assign a script if desired. Read more about scripts in Programming Puzzle Scripts
Manual completion
By default, when a component is activated, the system waits until it is solved or completed before triggering the next one. However, if no solved condition is defined, the system doesn’t know when the component is complete. As a result, the next component will activate immediately, running in parallel. This behavior might be intentional in some cases, but it can easily disrupt the intended game flow if not carefully planned. To prevent this, enable “Game Host must manually complete”. This ensures the Game Host manually confirms the completion of the component before the next one is allowed to activate. It provides precise control in situations where automatic detection isn’t possible or desired.
Duration
A assigned duration serves two purposes:
- Progress Calculation – The durations act as relative weights to estimate and display game progress in the Game Host application. For this purpose, the system rescales all durations proportionally to fit within the total room time.
- Experience Timing – For Experience tasks, the duration is applied in two ways: it is scaled for progress calculation (like other components) but also used as the exact wait time for the experience before players can proceed to the next task.
It’s important to understand that it’s often impossible to define exact times for solving puzzles or completing tasks. Instead, think of the durations as relative weights that describe how long one component is in relation to others (Puzzles, Actions, and Experiences). The system uses these weights to calculate progress dynamically. Even if the total of all assigned durations doesn’t match the actual room time, the system automatically rescales them to fit.
Example: Scaling Durations for Progress
Imagine a room with 16 tasks assigned durations like:
4, 1, 2, 6, 3, 5, 7, 2, 4, 8, 3, 6, 5, 2, 5, 6 (totaling 69 minutes).
However, the room is designed to last 60 minutes. To calculate progress, the system rescales these durations proportionally. For example:
- Step 1 (originally 4 min) → ~3.5 min in the scaled timeline.
- Step 10 (originally 8 min) → ~7 min in the scaled timeline.
In the Game Host application, progress is displayed based on this adjusted timeline, keeping the flow consistent even if players move faster or slower in practice.
Logic settings – Events
For each task, events can occur as long as the task is in the active state. You can define an effect sequence for each event. In addition to the fixed system events, you can also add custom user events based on specific conditions. The following events are available:
- OnActivate – Applicable to Puzzles, Actions, Experiences, and System tasks. This event triggers when the previous task is completed, and the selected task becomes active.
- OnCompleted – Applicable to Puzzles and Actions. This event triggers when the task is completed. A task is considered completed when its solved condition is met (note: only Puzzles and Actions can have solved conditions).
- OnReset – Applicable to Puzzles and the System task Room Start. This event triggers when the game is reset.
- OnCondition – Applicable to Puzzles only. This event is useful for user interactions. For example, you can play sounds when buttons in a puzzle are pressed or trigger other actions dynamically.
Logic settings – Gamehost information
In this tab, you can provide information that is displayed on an info page in the Game Host application. This helps the Game Host monitor the game effectively, track player progress, and guide them when needed.
First, you can collect a list of input objects related to the puzzle or action. This allows the Game Host to monitor player progress in real time and see, for example, whether object IDs equipped with RFID tags are already in place, magnetic contacts have been triggered, buttons have been pressed, or other electronically monitored inputs are active.
Additionally, you can add a solution note to inform the Game Host about the correct code or answer players should find in a puzzle. A solution note can be entered as plain text, or you can include a solution image to make the answer visually clear.
Logic settings – Solved conditions
In the solved condition, you define the criteria that determine when a Puzzle or Action is considered completed. This condition can be built as a combination of multiple sub-conditions, which are evaluated together using an AND logic (all must be true for the task to be marked as solved).
You can also set a solved delay to avoid accidental completions. For example, imagine a clock where players must set the hands to an exact time. Without a delay, players might briefly pass through the correct time while adjusting the hands, unintentionally solving the Puzzle. By adding a delay of 1–2 seconds, you ensure the correct time must be held intentionally before the Puzzle is marked as completed.
When using custom scripting, the solved condition is not defined here but should instead be handled directly in the script. Additionally, if the option “Game Host must manually complete” is enabled, the solved condition is not relevant at all and is therefore hidden in the interface.
Logic settings – Ready conditions
To help the Game Host verify that the room has been properly prepared, ready conditions are checked at the start of the game. If not in correct state, a warning will be shown. You can specify the required state for each Puzzle or Action so the system can confirm it is correctly reset before players begin.
The ready condition is derived from the same logic as the solved condition. In most cases, the desired state at the start of the game will be “Unsolved.” However, in some scenarios you may want it to be “Solved.” For example, if an Action controls a door, you might want the door to start in an open position (solved), then be closed, and finally marked as solved again when reopened during gameplay. If the initial state doesn’t matter, you can set the ready condition to “Don’t care.”
When using custom scripting, the ready condition is not defined here but should instead be handled directly in the script. Additionally, if the option “Game Host must manually complete” is enabled, the ready condition is not relevant at all and is therefore hidden in the interface.
Game Flow page – Locks , Switches and Triggers
In addition to the tasks (Puzzles, Actions, and Experiences) that form part of the logic diagram, there are other logic components: Locks, Switches, and Triggers. These are not tasks and do not appear in the diagram, but they can still be used at the logic level and controlled manually by the Game Host.
Furthermore, they can also be used within effect sequences, allowing you to:
- control locks and switches at a more higher logic level, and
- start other effect sequences by defining triggers
Locks and Switches
Of course, a lock can be controlled by changing the state of its output to locked or unlocked. But what if the Game Host wants to see the current state of the lock or, more importantly, manually override it?
By defining the lock at the logic level and binding it to the corresponding output, we can give the lock a more meaningful role in the system. This allows the Game Host application to display a dedicated control showing:
- the current state of the lock (locked/unlocked), and
- the ability to override the lock’s state manually, bypassing the normal game logic if needed.
In addition to this in-game control, the lock also appears in the Prepper app. This allows you to prepare the room properly, ensuring that objects are locked as required before the game starts.
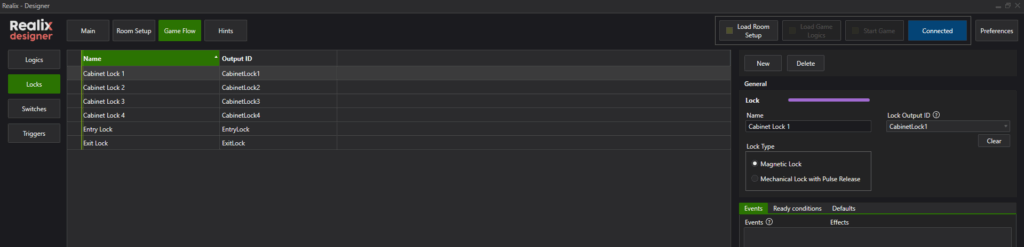
For locks, you can define two types of control:
- Magnetic Lock – This type uses an electromagnetic field to hold the lock closed. It stays locked as long as power is supplied and releases when the power is cut.
- Mechanical Lock with Pulse Release – In this type, the door or cabinet mechanically latches into a locked state. To unlock it, a short pulse is sent to a solenoid to release the latch.
When working with mechanical locks that use pulse release, you can configure the pulse duration to control how long the solenoid is activated. You can also optionally define a feedback input to detect whether the lock has been successfully released or if the door has been opened. While the feedback input is not mandatory, it is the only way for the system to confirm whether the lock has actually been released.
Locks and switches are very similar at the logic level. If you want to control other devices via the Game Host, or simply need switching on a logic level, you can define a switch. Unlike locks, switches do not have the specific lock control settings (such as magnetic hold or pulse release).
Locks and switches both have settings to define the state they should be in for the game to be considered prepared. You can also configure their default behavior. Typically, when the game is reset, all locks should be released. In most cases, when the game starts, locks need to be locked to ensure everything is in the correct starting state.
Triggers
Triggers are simple logic components with an attached effect sequence that runs when the trigger is activated.
They can be:
- Launched manually from the Game Host app (if configured to show).
- Called from another effect sequence.
- Activated automatically when players fail the game (e.g., time runs out) or at a specific point during the game.
In the designer, you can set:
- Show trigger when game is stopped – visible for manual use before or after a game.
- Show trigger when game is running – visible during an active game for host control.
- Triggers on game fail – runs automatically if the game ends unsuccessfully.
- Triggers on game time – runs automatically at a defined moment in the game timeline.
This makes triggers ideal for manual overrides, timed events, or chaining effect sequences together.
Game Flow page – Effect Sequence
Effect Sequences are used to organize multiple effects along a timeline. They make it easy to control lights, locks, and multimedia, and also allow you to coordinate these elements seamlessly with each other..
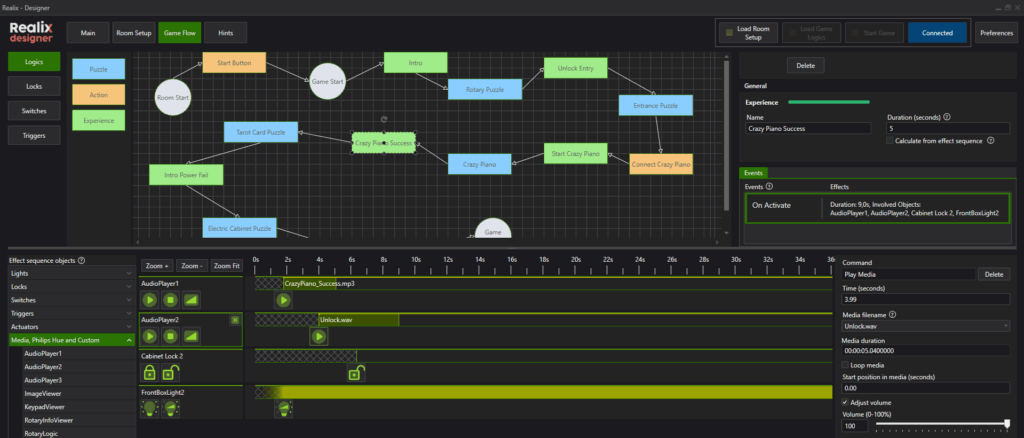
In the image above, the “Crazy Piano Success” is selected. On the right side, the “On Activate” event is highlighted, and below it, the effect sequence to be played is displayed. First, a success sound is played while the light in the cabinet, where the next puzzle begins, is turned on simultaneously. Then, an unlock sound is triggered, and shortly after, the cabinet is unlocked.
On the left side, you have access to your full repository of basic objects, as well as higher-level controls like Locks, Switches, and Triggers. To add an object or control to the timeline, select it and choose Add.
Once the object is on the timeline, you can start adding effects by selecting one of the icons on the object’s control panel—for example, Lock, Unlock, or Play. You can drag these effects along the timeline to position them relative to other effects, ensuring that their timing aligns as intended within the sequence.
The section of the timeline before the first effect appears as a hatched (or shaded) area. This area indicates that the object’s initial state is undefined. This is important: when setting up an effect sequence, it may be unclear what the object’s current state is—for instance, a light might have brightness set to 0 and color set to blue. If you only apply a fade on brightness, the system doesn’t know what color the light is starting from, so the transition can’t be fully defined.
Effect sequences are often triggered by user actions. As a result, the exact state of objects at the time the sequence begins is frequently unknown. That’s why relative timing between effects is crucial—it allows for flexible and consistent behavior even when the starting conditions vary.
Each effect has properties such as color, brightness, a value to set, or media to play. These properties can be configured in the panel on the right side.
Game Flow page – Control and Simulation
The Game Flow page displays a control and simulation panel instead of the effect sequence panel. This panel allows you to test puzzles either individually or in combination. To support testing even without hardware, you can simulate the values of input objects. The inputs that appear in this panel depend on the selection of objects chosen to be monitored for each task.
Hints Page
The Hints page allows you to create and manage predefined hints, which can include plain text but also video, audio or an image. If a hint is related to a specific game task, you can assign it directly to that task. Hints can be made available globally or linked to individual tasks, making them easy to select and send through the game host application during gameplay.
Logics Console
The Logics Console is an additional page that appears when the game logics are loaded. It is primarily used for debugging purposes. You can monitor which effects are launched, when a puzzle is activated or completed, and check the overall flow. Most importantly, the console helps you identify when a script causes an exception, allowing you to debug issues effectively.