
Introduction
The Realix ERC system allows you to design and run escape room experiences with high flexibility and control. This escape room controller installation guide explains how to set up the Realix Server, Designer, and Game Host applications step by step.
- Realix Server – Core backend service that coordinates all logic and devices.
- Designer – Used to create and configure your escape room games.
- Game Host – Used by the game master to run and control the game in real time.
- Prepper – Used by the game master to prepare the room.
The Realix Server, Designer, and Game Host are all Windows applications that require installation. In contrast, the Prepper is a web application hosted by the Realix Server—it runs on any device, including mobile phones, and does not require installation. Depending on your setup, the three Windows applications can run on a single PC or be distributed across multiple machines within the same local network.
System Requirements
- Operating System: Windows 10/11
- RAM: Minimum 16 GB
- Disk Space: At least 1 GB per application
- Network: Required for multi-device setups (LAN)
All applications are built for Microsoft Windows.
Recommended Setup Scenarios
You can run all applications on one computer, if you have multiple rooms the Designer might be on its own computer because it can be used for all your running escape room projects in a central place.
| Scenario | PC 1 | PC 2 | PC 3 |
|---|---|---|---|
| All on one | Server + Designer + Host | – | – |
| Semi-distributed (most common) | Designer | Server + Host | – |
| Fully distributed | Designer | Server | Host |
Setup Realix Server
Installation
- Download the latest version of the Realix Server from the downloads page.
- Run the installer and complete the setup wizard.
- The Server will be installed as a Windows Service and will start automatically with the computer—no user login is required.
Note: The Realix Server is required for both testing and live gameplay.
Setup Realix Designer
Installation
- Download the Designer application from the downloads page.
- Run the installer and complete the installation.
- Launch the Designer to begin creating your first escape room project.
You can design without the server running, but testing requires an active server connection.
Connect to the Server
The Designer must connect to the Realix Server to test and preview your game. Server connections are project-specific, meaning each project can be linked to a different server.
- After creating a project, the Designer will scan your network for available servers.
- If multiple servers are found, a list will be displayed for selection.
- Once selected, the server connection becomes part of the project configuration.
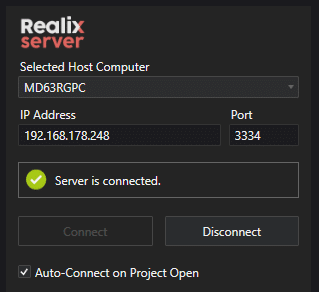
- Select the server from the dropdown list. The displayed name corresponds to the computer name where the server is running. If you have multiple servers, it’s a good practice to assign meaningful names to each computer for clear identification.
- Enable Auto-Connect on Project Open to automatically connect to the server when opening a room project, allowing you to start testing more quickly.
You can manage multiple escape room games from a single Designer installation. Each game links to its specific server instance.
Preferences
The following preferences can be set in the Designer
- User Interface Style, Light or Dark theme.
- Start Maximized
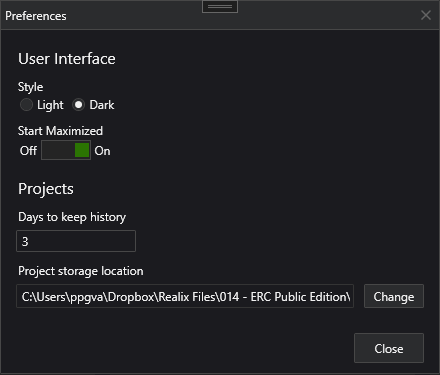
- Projects history to keep. Each time when saving the previous project is moved to the history folder.
- Project storage location. All projects are stored in this location, changing the location gives you the option to move all projects. Read more about project management in Project Management
Important: The Designer maintains a history of changes but does not create full backups. It is the user’s responsibility to regularly back up the project files from the designated storage location to ensure recovery in case of data loss.
Setup Game Host Application
Installation
- Download the Game Host application from the downloads page.
- Install it on the PC that will be used by the game host.
- Launch the Game Host application to prepare for server selection and runtime control.
Connect to the server
The Game Host also uses auto-discovery to detect Realix Servers on the local network.
- On first launch, go to the Settings.
- Select the server on which this server should connect. This setting is saved and used in the future sessions.
Other Preferences
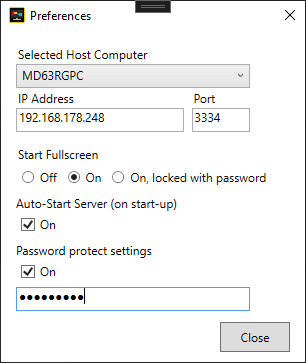
- You can choose to always launch the application in full-screen mode and optionally lock this setting as part of the password setting. The interface automatically scales to fit the screen, but it is best viewed on a display with an HD aspect ratio (16:9).
- Auto-Start the Server: By default, the Server (running as a Windows Service) does not automatically load a room configuration when it starts. Enabling this setting allows the Game Host application to automatically load the configuration when it launches—ensuring the server is ready without manual intervention.
- The server selection and the other settings can be password protected to prevent unauthorized changes during gameplay.
Password protection is especially useful when the Game Host is used by staff members or during live games, where settings should remain fixed.